ThinkSpace (a tech group from main campus) came to visit the Con and made sure they brought all of their music based projects including a virtual reality game which was similar to fruit ninja however with a focus on rhythm.
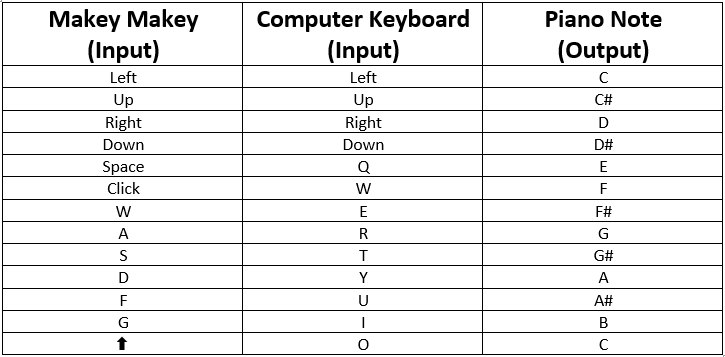
When I tested the piano with the remapped Makey Makey, I noticed that two of the notes were playing at the same time when only one of them were touched.
I eventually figured out tha this was happening because the aligator clips were touching and these are metal, therefore conductive.
I have now put electrical tape around each connection so that they aren’t exposed.
6 hours, 2 blocks of cheese and 1 pack of tim tams later, we completed our large scale floor piano!
We started by sticking our yoga mats to the bottom of our large piece of plywood. The idea behind this is that when people are jumping on the keys, it will give it a little bit of give rather than a strictly hard surface.
This guy helped us out:
We then tested our materials on a piece of scrap plywood in order to figure out how to layer the duct tape and aluminum foil tapes and still allw it to be conductive. The main things we discovered were:
The jumper leads didn’t have to be between two pieces of al-foil tape. They could be stuck down straight onto the board with the al-foil tape and it would still receive the signal.
We could stick the lead on top of duct tape with al-foil tape and it would still recieve the signal.
Our earth could be any other piece of al-foil that wasn’t touching the other pieces and the lead from that piece of foil had to connect to the earth bar at the bottom of the Makey Makey.
We then used a builders square (handy to have a Dad that was a Carpenter) to measure out our keys. We penciled them in and then taped 4 strips of overlapping al-foil tape in between, leaving small gaps next to each penciled-in line to ensure the keys weren’t touching.
Next, we taped down grey duct tape between each tile to fill in our gaps.
We then had to earth all of the keys. We did this by taping down a long strip of the al-foil tape along the bottom of our keyboard which then attached to a thin strip of tape at the very end of our keyboard which taped down a jumper lead which was connected to an alligator clip which was attached to the earth section on our Makey Makey. Simples!
The building square was used again to measure out the black keys and then we filled them in with black duct tape.
We then used small strips of al-foil tape (cut to 3/4 of the width) to stick down our leads to connect to the Makey Makey.
Across the top of the keyboard we then taped down a strip of grey duct tape, overlapping all of those strips of al-foil tape (this is so that we can connect all of the earth strips for these keys later).
We then added a strip of al-foil tape to one black key and hooked the two strips on the one key up to the makey makey to test whether it would recieve the signal. It did!
We then repeated this for the rest of the black keys.
These were then connected by a strip of al-foil tape across the top of the keyboard with only one jumper lead stuck down in the middle of this large strip of tape. This meant that we only needed one lead connected to the Makey Makey to earth all five keys.
We then used small bits of black duct tape to overlap each end of our black keys to make them look more like black notes on a keyboard and also just to tidy the whole thing up.
Then it was time to teast out that the Makey Makey would receive a signal from all of our keys when they were pressed. We attached alligator clips to the end of each jumper lead that was stuck down at the top of our keyboard and attached them to the makey makey. When we ran out of connections for alligator clips. We connected them to another jumper lead and inserted them into the small holes in the back of the Makey Makey.
The green light on the Makey Makey means that it has receive a signal:
We then tested it out with a Scratch program we had found on… well… Scratch, (fancy that), that was programmed to play certain notes when certain keys on the keyboard were pressed. At this point we hadn’t remapped the Makey Makey to play the right notes, so it is a bit random. There is even a glockenspiel in the lower half of the octave… But the green light is the main thing!
I booked a workshop for a few people doing my degree at uni and me to learn how to use a 3D printer. It was a really useful hour workshop. The main things we learned were:
I thought this could be a great way for us to extend our own understanding of technology and help us brainstorm for our digital projects due at the end of semester. They even had some musical examples of past projects to show us in the workshop including a recorder, an ocarina, panpipes and some maracas.
The person running the workshop made cat ear rings for all of us as well!
Sydney Uni allow all students to print for free for 2 hours at a time so I definitely want to go back to make something.
To choose the key of my composition I looked at the instrumentation I wanted. I had already decided I wanted a clarinet to play the melody. The clarinet is a Bb instruments therefore I decided I would write in Bb Major.
I then had to transpose the chord progression, from my model piece, that I wanted to feature in my composition.
I started by listening to the chord progression in my model piece and notating the bass line. I then tried to notate each of the individual voices in the strings, listening specifically to the overall movement of each line.
Now that it is transposed it looks like the following:
The chord progression is I-IV-I-V
I also used these chords to compose an arpeggiated harp part:
One of my classes at uni this semester requires me to compose a 2-3 minute piece based on a model piece of my choice. The model piece I have selected is ‘Maleficent Flies’ by James Newton Howard from the film ‘Maleficent’. It is the same piece I used as the model in my ‘Composing with Baby Steps’ website which you can also find a link to in this blog.
The main features from this piece that I wish to “borrow” for my own are:
Instrumentation
Chords played by the strings
Same homophonic texture however with a clarinet solo rather than a vocal solo.
Chord Progression at 1:49-1:57
Dramatic change in melodic material at 2:07 with more of a rhythmic drive.
Return to original melodic material however in the strings rather than the vocals.
Return to A is fuller in texture with a larger ensemble (bringing in the brass players), fortissimo dynamics.
A modified version of the A section with the original thin texture.